If you’re using Cal.com to schedule your client meetings, coaching calls, or demo sessions — great choice.
But there’s one big problem: your analytics stack probably has no idea when someone successfully books.
📉 You’re flying blind with:
- No conversion events in Google Analytics 4 (GA4)
- No leads tracked in Meta Ads or Google Ads
- No attribution on your landing pages
Why? Because Cal.com runs inside an iframe, and most tracking scripts can’t “see” what happens inside it.
But here’s the good news: Cal.com sends a booking confirmation signal (via something called postMessage). And using Google Tag Manager (GTM), you can catch that signal and fire your tags — no code changes to your site needed.
Let’s break it down 👇
🚧 Why Your Tracking Is Broken (And What Cal.com Actually Sends)
Most people embed Cal.com on their site using an iframe.
That iframe lives in its own world — so your GA4 or Meta Pixel tags on the main site don’t know if someone completed a booking.
But Cal.com solves this by sending a special signal from the iframe to your website when a booking is successful.
Your job? Use Google Tag Manager to “listen” for that signal and push it into your analytics system.
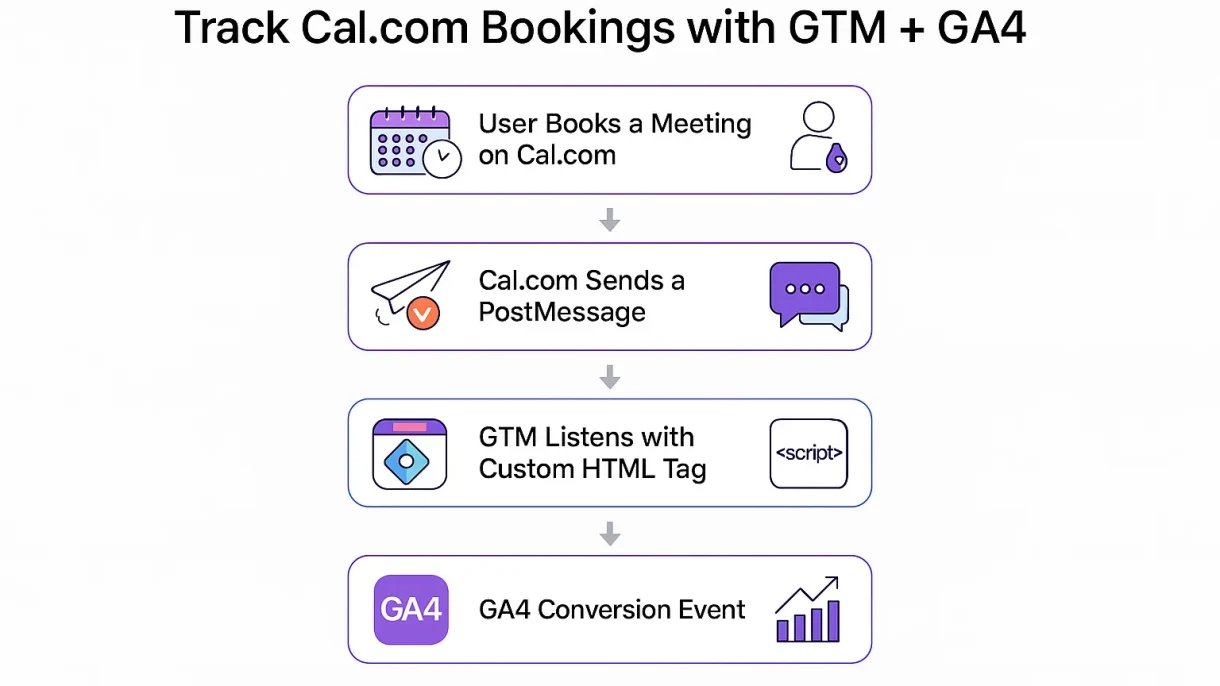
🖼 Suggested Image:
Illustration showing a website with an embedded Cal.com iframe sending a postMessage → GTM catching the signal → GA4/Meta receiving it.
✅ What You Can Track
By setting up GTM correctly, you’ll unlock:
| Platform | Conversion Tracked |
|---|---|
| Google Analytics 4 | ✅ Yes (event) |
| Google Ads | ✅ Yes (conversion) |
| Meta Ads | ✅ Yes (Lead/Purchase) |
| CRM or Zapier | ✅ Yes (webhook or event) |

🛠 Step-by-Step: Track Cal.com Bookings in GTM
Step 1: Add a Listener in GTM via Custom HTML Tag
Use a “Custom HTML” tag in GTM to listen for Cal.com’s booking confirmation.
📌 paste the code snippet into the tag editor.

Triggers → New → All Pages (or only where the Cal.com iframe appears).
Click Save
Go to GTM Preview and hit the booking submit and boom!

Step 3: Create Variables in GTM for DataLayer Values
Go to Variables → New → Data Layer Variable and create:
Data Layer Variable Name: bookingId
Name: DLV - bookingId

Step 4: Create Trigger for Cal Booking Event
Go to Triggers → New → Custom Event:
- Trigger Type: Custom Event
- Event Name:
cal_booking_success
Name it: TR – Cal Booking Success

Step 5. Send Event to GA4
CCreate a new Google Analytics: GA4 Event tag:
- Configuration Tag: Your GA4 config
- Event Name:
cal_booking_success - Event Parameters:
booking_id→{{DLV - bookingId}}
Trigger: TR - Cal Booking Success

Step 6. Debug in GA4 DebugView
Open Tag Assistant → Enable Debug Mode
Visit your site with the Cal.com iframe
Make a test booking
In GA4 > Admin > DebugView, check the following:
- An event called
cal_booking_successshould appear - Click the event to see if
booking_idandresponsesshow as parameters

Bonus: Send Name, Email & Phone for Enhanced Conversions
Want to unlock Enhanced Conversions for Google Ads or send more granular lead data to platforms like Meta CAPI or CRM tools?
You can do it by extracting and pushing first-party data (name, email, phone) from Cal.com booking as shown above screenshots.
🔗 Need Help Setting It Up?
If you’re not sure where to begin, or want us to do it for you — let’s chat. I’ll help teams set up advanced analytics tracking without overengineering.
